Showing posts with label Adobe. Show all posts

Adobe Photoshop Lightroom v4.2 Multilingual Incl Keymaker-CORE

Tuesday, October 9, 2012 0 comments


Adobe Photoshop Lightroom v4.2 Multilingual Incl Keymaker-CORE

Adobe Photoshop Lightroom 4 software provides a comprehensive set
of digital photography tools, from powerfully simple one-click
adjustments to cutting-edge advanced controls. Create images that
inspire, inform, and delight.

http://www.adobe.com/products/photoshop-lightroom.html

How to create a Facebook fan page with Flash.

Wednesday, March 7, 2012 0 comments


Problem


Facebook has changed their site (apps and pages) in Feb, 2012!

Solution


Please view details!

Detailed explanation


Facebook has changed their site (apps and pages) in Feb , 201 2.
You want to install a Facebook fan page using a Flash template.
Login or create your facebook account at http://www.facebook.com
l If you do not have a fan page, you can create one at: http://www.facebook.com/pages/create.php


l For details on creating your app on Facebook ,see http://www.facebook.com/developers/.

1. click "Set Up New App" at top right.

2. Enter the Essential Information with your application name

3. Submit App

4. Edit your app information,import set "Facebook Integration". Use your template path and your application name

5. Click save and then click "Application Profile Page"

6. To add to your fan page, click"Add to My Page",and then select your page to add it

l If all steps are complete and OK ,you can open your page and view it.
http://www.facebook.com/pages/browser.php or search your page name
Because Facebook has changed many of their apps and pages, we must learn new methods of how to install a Facebook fanpage.
Please click here online view PDF help , if your browser support:
Download .pdf here
---------------------------------------------------------------------------------------------------------
You also can down the .zip file with the help pdf:
Download .zip here

Using SWC files to build large Flash and AIR projects with multiple SWF files for iOS

0 comments

When doing game development for Android or Blackberry Tablet OS with Adobe AIR, you can load SWF files on the fly at runtime; with AIR for iOS, there is no such option. On Android or Blackberry Tablet OS the code is interpreted from ActionScript bytecode, whereas for iOS all code must compiled from ActionScript bytecode to native bytecode as a single IPA file, which you can only create from a single SWF.
If your game has dozens of levels and each level is a SWF, then compiling for iOS can be a challenge. When you're in the game programming and testing phase of development, you can use ipa-test-interpreter switch in the compiler settings, and your game will run as it would on Android or BlackBerry Tablet OS. However, Apple will not accept games built using this approach in the App Store, so you need a different approach for your release build.
One solution is to compile each level to a SWC library, and then link all the SWCs into a single SWF file (see Figure 1).

Figure 1. For iOS, first compile SWCs and then link them together to produce a single SWF file.

Creating a single SWF from SWCs


If you're using Flash Builder, you'll need to use a Flex Library Project (see Figure 2), which outputs a SWC file, instead of an ActionScript project, which outputs a SWF.

Figure 2. Select Flex Library Project, which creates a SWC file.

In Flash Professional CS5.5, you can use an option in the Publish Settings dialog box to generate a SWC instead of a SWF (see Figure 3).

Figure 3. Select SWC under the Publish options in the Publish Settings dialog box.

Where to go from here


When you use the technique outlined in this article for your iOS game development, you'll need to instantiate new levels at runtime instead of loading them dynamically. Remember, it is possible to load SWF files on iOS, but the code inside them won't be interpreted. Loading a SWF in this way is useful for graphical assets such as animations or vector graphics. You can create a library full of symbols and simply pick the symbol that you want to use.
Lastly, note that this technique works for ActionScript 3, but not ActionScript 2.

Adobe Photoshop Touch for iPad

Thursday, March 1, 2012 0 comments

Photoshop Touch_2


When it comes to image editing and processing, the one name that stands out is Adobe Photoshop even with its hefty price tag. It comes with tons of features and options which makes it one of the best image editing tools. Now Adobe has released a Photoshop app for iPad, Adobe Photoshop Touch which brings in many features of the desktop app to iPad. Photoshop Touch is a fully touch optimized version which comes with features like layers, selection tools, adjustments, filters and basic editing. You can pull images from your Facebook account, Google images or from iPad’s camera as well.

Photoshop Touch_3 

Another important feature of this app is the social networking integration, you can easily share your photos with your Facebook friends and view comments left by your friends on the photos right within the app. The maximum image resolution supported is 1600 x 1600 pixels.

Photoshop Touch_5
Photoshop Touch_4
Photoshop Touch_7
Photoshop Touch_6

There is also step-by-step tutorials to easily learn techniques the pros use for great-looking results. Overall, we feel the app is pretty good and comes with handy set of the features to edit images from your iPad. The app is priced at $9.99, although on the higher side like the desktop apps, does the job of editing images pretty well.

Download Photoshop Touch for iPad


Photoshop CS6 Will Easily (and Skillfully) Fake a Shallow Depth Of Field

0 comments

Even though you're only shooting with the crappy camera built into your smartphone, Photoshop CS6's new Blur Gallery will easily make it look like your shots came from an expensive DSLR.
Properly faking a shallow depth of field usually involves creating and strategically masking multiple layers with various levels of blur on each of them. But in Photoshop CS6 you just specify what in your image you want kept in focus, and adjust the shape and size of the area around it that's not blurred. That's it. Just a few clicks takes you from an amateur photog to a fake Ansel Adams. [YouTube via PetaPixel]


Photoshop CS5 All in One For Dummies

Monday, February 27, 2012 0 comments


 Photoshop CS5 All in One For Dummies


Photoshop CS5 All in One For Dummies by Barbara Obermeier


Adobe Photoshop CS5
Description : Excellent Book to master the Photoshop from Beginning to Advance level, Photoshop CS5 All in One For Dummies will teach you adobe Photoshop in an easy way, It contains lot of examples, images, graphics to help you out, and to make better understanding about what author is trying to teach you.

Photoshop CS5 All in One For Dummies 
Photoshop CS5 All in One :

Some of the contents of Book...

01: Examining the Photoshop Environment
02: Getting to Know the Tools Panel
03: Starting, Finishing, and Getting It on Paper
04: Viewing and Navigating Images
05: Customizing Your Workspace and Preferences
06: Specifying Size and Resolution
07: Choosing Color Modes and File Formats
08: Using and Managing Color
09: Time Travel — Undoing in Photoshop
10: Creating Actions for Productivity and Fun
11: Making Selections
12: Creating and Working with Paths

778+ page


Create Grainy Textures with Illustrator

0 comments

Creating grainy textures are great for retro illustrations, typography, and logos. Alternatively, you can incorporate these effects into compelling new styles. You can always scan in similar textures and Live Trace them in Illustrator, but you can pretty easily create this type of effect all inside Illustrator!

Final Image

Here is a sample image of what these techniques can do. Further down in the tutorial, I give a quick breakdown of the process.
Final Image

Tutorial Details

  • Program: Adobe Illustrator CS5 (You should be able to create this tutorial in CS4 and CS3 but some of the tutorial images might look different.)
  • Difficulty: Beginner / Intermediate
  • Topics Covered: Grain Effect, Gradient, Gradient Meshes, Blends
  • Estimated Completion Time: 15-20 minutes

Grainy Textures

In the following sections I’ll show you how to create these grainy textures from a couple of different elements within Illustrator. Basically you can create these textures from any element that contains a graded value of color (like a gradient). I’m sure some of you have already figured out this technique by creating some of the past Vectips texture tutorials or on your own, but for those of you that haven’t, you should have fun.

Gradients

Basic

First up is gradients. Gradient are good for creating grainy textures that don’t require any complex contours to the texture. To start, create a simple linear gradient with the default white and black color stops in a rectangle. With the gradient selected, go Effect > Texture > Grain. In the Grain Effects dialog, change the Intensity to 74 (you can experiment with this number to get the grain you desire), Contrast 50, and Grain Type to Sprinkles. That’s really all! The real magic comes when you apply color and blending modes to the texture.
Gradient Grain

Color

You can change the color stops in your gradient, but I like to place an object or new fill below the grain effect and set the grain’s blending mode to Multiply because of the white space the Grain effect creates. Let’s take a look at doing this with the Appearance panel.
Take your same rectangle and fill it with a solid color. From the pop-up menu of the Appearance panel, select New Fill. Select the top copy and fill it with a linear gradient. Change the first color stop to white and the second to a darker color than your original. With the gradient fill still selected, apply your Grain effect and set the Blending Mode to Multiply from the Opacity item under the gradient fill.
Gradient Grain Color

Gradient Mesh

Basic

Gradient Meshes are great for creating more complex shapes with grainy textures. To start, draw an abstract shape with a tool of your choosing and fill it with black. You can either go Object > Create Gradient Mesh and set a specific numbers of points or use the Mesh tool (U) to click on your artwork to add mesh point. I’m using the Mesh tool (U), so deselect the artwork, select white from my swatches, and with the Mesh tool (U) click on the artwork to add points. Now, apply the grain effect like before.
Gradient Mesh Grain

Color

Like with the Gradient technique, meshes work great with a color underneath and the grain’s blending mode to Multiply. Start the original shape a solid color and Copy (Command + C) and Paste in Front (F). Change the fill of the copy to a darker color of the original shape, apply the white mesh points, apply grain, and set to Multiply.
Gradient Mesh Grain Color

Blend

Basic

Blends tend to work great for either simple grainy textures or complex ones. It really just comes down to how you work and which is more comfortable, but the principle is pretty much the same. For the example, created a shape, go Object > Path > Offset, fill the offset with white, select both copies, and go Object >Blend > Make. Finally, apply your grain effect.
Blend Grain

Color

Like both the Gradient and Gradient Mesh, it’s good to have an underlying color. Also like gradient meshes, you will need a copy of the original shape above the color with a darker color, grain, and blending mode set to Multiply.
Blend Grain Color

Quick Tutorial

Here is a quick tutorial utilizing some of the techniques. I won’t go into much depth, it’s just to get an idea of how to use these techniques in an illustration.
First, I created a sketch, scanned it, and traced it with the Pen tool (P). Next, I filled the trace with color, and added stroked paths set with one of Illustrator new Stroke Profiles (Width Profile 1). To add more depth with the grain textures, I started with the linear gradients in the skin and hair. I used a blend for the outline grain texture face shape and used a gradient mesh for the collar of the character’s shirt. For the background I used a big radial gradient grain texture. I also used a radial gradient with the first color stop white, the second white with 0 Opacity, grain, and set the Blending Mode to Overlay.
Grain Process

Experiment

This is a great technique to experiment with! Experiment with different colors, shapes, blending modes, and layering of textures. Try these techniques on graphical elements other than illustrations. They work great on text, logos, UI elements, and more! You can even incorporate these effects with some of the other texture techniques I have written about.

Key Adobe Creative Suit 5.5 Master Collection

Friday, February 10, 2012 0 comments


Hi all , hope you are doing fine ! Adobe Creative Suit 5.5 Master Collection has been posted in the website and it turns out that those keys in the keygen has been expired somehow ! I decided to post new keys and new solutions for it !


New Keys :


1325-1009-2009-6471-6851-6955
1325-1002-9106-0949-3519-6095
1325-1007-7415-6074-2804-9985
1325-1009-7554-4347-8209-4404
1325-1003-6330-8779-5927-4173
1325-1004-5428-5734-8824-1279
1325-1006-4709-6870-8629-2283
1325-1001-5149-0302-0001-2984


Adobe Lightroom 3.4 Final x86 Silent Instans Install.

Tuesday, January 31, 2012 0 comments


Lightroom software provides a comprehensive set of digital photography tools, from powerfully simple one-click adjustments and features to cutting edge advanced controls. With Lightroom, you can organize, enhance, and showcase your images all from one fast and nimble application that's available on Macintosh and Windows® platforms.
  • Get the highest possible quality from every pixel in your images using state-of-the-art editing tools.
  • Easily showcase your work to friends, family, and clients. Craft elegant photo books and share your photographs on social networks or in web galleries, slideshows, prints, and more.
  • Manage your entire photo collection in a visual library that makes it quick and easy to organize, find, and select your images.


 UPDATE NEWS


Introducing Lightroom 4 Beta

Lightroom 4 beta builds on the vision of the very first Lightroom beta. From day 1, Lightroom was designed for photographers and by photographers to help them focus on what they love—the art and craft of photography. Lightroom provides photographers with an elegant and efficient way to work with their growing digital image collections, bring out the best in their images, and make an impact from raw capture to creative output, all while maintaining the highest possible quality each step of the way.

For the development of this latest release, we've focused on further maximizing image quality and expanding output options. New tools let you extract more detail from highlights and shadows, make a wider range of targeted adjustments, and easily share your images and video clips on social media and photo sharing sites.

New Features in Lightroom 4 Beta

  • Highlight and shadow recovery brings out all the detail that your camera captures in dark shadows and bright highlights.
  • Photo book creation with easy-to-use elegant templates.
  • Location-based organization lets you find and group images by location, assign locations to images, and display data from GPS-enabled cameras.
  • White balance brush to refine and adjust white balance in specific areas of your images.
  • Additional local editing controls let you adjust noise reduction and remove moiré in targeted areas of your images.
  • Extended video support for organizing, viewing, and making adjustments and edits to video clips.
  • Easy video publishing lets you edit and share video clips on Facebook and Flickr®.
  • Soft proofing to preview how an image will look when printed with color-managed printers.
  • Email directly from Lightroom using the email account of your choice.
Watch the What's New in Lightroom 4 beta tutorial videos for additional details
The Lightroom 4 beta program is available to the public. Anyone with an Internet connection can download it and start putting it to the test. You do not need to own (or have tried) a previous version of Lightroom. You can download the beta and use it until the product expires on March 31, 2012.


Autosave for Illustrator, Autosave for Flash… Autosave for any program!

Thursday, December 22, 2011 0 comments


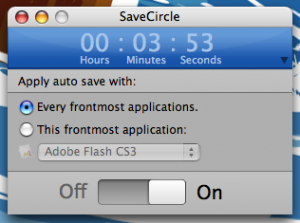
picture-22-300x223

I cannot tell you how many countless hours I’ve lost because of a lack of an autosave feature on some of my design programs. For some reason, the developers haven’t got it through their heads that this is a paramount feature that every designer needs.
Enter SaveCircle. Now not only does it save for my design programs likeDreamweaverFireworksIllustratorPhotoshop and Flash (InDesign is the oneAdobe program that already has it), but it works with ANY program. Word,Bryce 3DMaya, whatever!
If you’re a PC (and you sell fish), there is a PC based program out there that seems similar.
If you try it out, let me know how it works by commenting here, (’cause I’m no longer a PC).

credits to : http://zerflin.com/

real. good. design.

Adobe Photoshop CS6 v13.0 Pre Release Window & MacOSX Incl Keymaker-CORE

Friday, November 11, 2011 0 comments


Adobe Photoshop CS6 v13.0 Pre Release Window & MacOSX Incl Keymaker-CORE
WIN: 1.65GB | MAC: 1.01GB

The newest version of Adobe® Photoshop® CS6 software redefines digital imaging with breakthrough tools for photography editing, superior image selections, realistic painting, and more. And now, use it with creativity-boosting mobile apps. Adobe Photoshop software, the professional image-editing standard and leader of the Photoshop digital imaging line, delivers more of what you crave.

Adobe® Photoshop® CS6Extended software delivers breakthrough capabilities for superior image selections, image retouching, realistic painting, and 3D extrusions. Experience 64-bit support for fast performance as well as dozens of time-savers throughout your workflow. Go beyond traditional digital imaging. Easily select intricate image elements, such as hair. See space fill in almost magically when you remove image elements. Create 3D logos and artwork by easily extruding text and other 2D graphics. Achieve natural and realistic painting effects with the Mixer Brush, which offers on-canvas color blending; Bristle Tips, which let you create lifelike, textured brush strokes; an onscreen color picker; and more.

Create images with instant impact with Adobe Photoshop CS6-the industry standard in digital imaging software. Adobe Photoshop CS6 redefines digital imaging with powerful new photography tools and breakthrough capabilities f complex image selections, realistic painting and intelligent retouching. Easily select and mask intricate image content such as hair. Remove any image element and watch the space fill in almost magically. Create stunning high dynamic range (HDR) images. Paint with realistic strokes and colour blends. Remove noise, add grain and create vignettes with state-of-the-art photography tools.


Download Link

Filesonic
http://www.filesonic.com/file/2608210791/Adobe.Photoshop.CS6.v13.0.Pre.Release.Incl.Keymaker-CORE.part1.rar
http://www.filesonic.com/file/2608210781/Adobe.Photoshop.CS6.v13.0.Pre.Release.Incl.Keymaker-CORE.part2.rar
http://www.filesonic.com/file/2608210771/Adobe.Photoshop.CS6.v13.0.Pre.Release.Incl.Keymaker-CORE.part3.rar
http://www.filesonic.com/file/2608210761/Adobe.Photoshop.CS6.v13.0.Pre.Release.Incl.Keymaker-CORE.part4.rar

Wupload
http://www.wupload.com/file/434272089/Adobe.Photoshop.CS6.v13.0.Pre.Release.Incl.Keymaker-CORE.part1.rar
http://www.wupload.com/file/434272087/Adobe.Photoshop.CS6.v13.0.Pre.Release.Incl.Keymaker-CORE.part2.rar
http://www.wupload.com/file/434272081/Adobe.Photoshop.CS6.v13.0.Pre.Release.Incl.Keymaker-CORE.part3.rar
http://www.wupload.com/file/434272078/Adobe.Photoshop.CS6.v13.0.Pre.Release.Incl.Keymaker-CORE.part4.rar

Fileserve
http://www.fileserve.com/file/98Tq6yK/Adobe.Photoshop.CS6.v13.0.Pre.Release.Incl.Keymaker-CORE.part1.rar
http://www.fileserve.com/file/gSbNAZV/Adobe.Photoshop.CS6.v13.0.Pre.Release.Incl.Keymaker-CORE.part2.rar
http://www.fileserve.com/file/dBnxZHE/Adobe.Photoshop.CS6.v13.0.Pre.Release.Incl.Keymaker-CORE.part3.rar
http://www.fileserve.com/file/ZuF5VUc/Adobe.Photoshop.CS6.v13.0.Pre.Release.Incl.Keymaker-CORE.part4.rar


Adobe.Photoshop.CS6.v13.0.Pre.Release.MacOSX.Incl.Keymaker-CORE
Filesonic
http://www.filesonic.com/file/2608182621/Adobe.Photoshop.CS6.v13.0.Pre.Release.MacOSX.Incl.Keymaker-CORE.part1.rar
http://www.filesonic.com/file/2608182191/Adobe.Photoshop.CS6.v13.0.Pre.Release.MacOSX.Incl.Keymaker-CORE.part2.rar
http://www.filesonic.com/file/2608181471/Adobe.Photoshop.CS6.v13.0.Pre.Release.MacOSX.Incl.Keymaker-CORE.part3.rar

Wupload
http://www.wupload.com/file/434270126/Adobe.Photoshop.CS6.v13.0.Pre.Release.MacOSX.Incl.Keymaker-CORE.part1.rar
http://www.wupload.com/file/434269219/Adobe.Photoshop.CS6.v13.0.Pre.Release.MacOSX.Incl.Keymaker-CORE.part2.rar
http://www.wupload.com/file/434267034/Adobe.Photoshop.CS6.v13.0.Pre.Release.MacOSX.Incl.Keymaker-CORE.part3.rar

Fileserve
http://www.fileserve.com/file/n5A4scG/Adobe.Photoshop.CS6.v13.0.Pre.Release.MacOSX.Incl.Keymaker-CORE.part1.rar
http://www.fileserve.com/file/vwf9j4S/Adobe.Photoshop.CS6.v13.0.Pre.Release.MacOSX.Incl.Keymaker-CORE.part2.rar
http://www.fileserve.com/file/WDZrKpe/Adobe.Photoshop.CS6.v13.0.Pre.Release.MacOSX.Incl.Keymaker-CORE.part3.rar


GuaBlog!

OhBelog!

Qoute from A's desk

Who walks the path of heaven will rule over everything... Bring the Peace, Keep the Peace, Walk in Peace then Rest in Peace...

Total Tayangan Laman

Followers

About Me

Recent Posts


ShoutMix chat widget

Link

Blogger Widgets
Related Posts Plugin for WordPress, Blogger...

Please help pay cup of coffee for us~

abrapism almawalker. Theme images by sndr. Powered by Blogger.

Popular Posts